Friday, June 30, 2017

Hope Anchors the Soul

Good morning!  I hope this Friday finds you making plans for a wonderful weekend.  Tomorrow, I will be back with a new post for Our Daily Bread Designs featuring the new July release.  But in the meantime, I wanted to circle back and show a card featuring a Stamp Die Duo from last year, You Anchor Me.

I actually used the Scalloped Chain Die from this month's release as a fun accent panel.  It is in the rich blue over the water themed DP from the Nautical Paper Collection.  I used a die from the Rectangles Die nested with the Circle Scalloped Rectangles Die to create the focal frame.  Here are a few of the items you see used today...


Don't forget to stop back by tomorrow to see the fun projects I have to share.  Blessings!

Sunday, June 25, 2017

~ Wishing You ~

I am a sucker for a wedding.  I am probably the sappiest (is that a word?) person you will ever meet.  Just a few hours prior to writing this post, I finished up watching another Hallmark June wedding movie...  I would get married every week.  To the same wonderful guy of course...  but I'm pretty sure he would kill me!  lol...  I love the preparation, the festivities, the decor...  And I am especially LOVING the rustic/country decor that has taken over this part of the country.  My Pinterest feed has been taken over lately by wedding cakes...  and not just the traditional white frosting with basket weave but creative masterpieces designed to look like anything other than a cake.  I keep seeing cakes designed to look like birch trees and so I had to try to create my own version using Our Daily Bread Designs' Long Lasting Love.

Layer by Layer

  1. White Card Stock - 4.25 x 11 inches; scored and folded at 5.5 inches
  2. Silver DP (4.25 x 5.5 inches) ODBD's new Wedding Wishes Paper Pad
  3. Pattern DP Wedding Wishes Paper Pad cut with ODBD's Rectangles Die
  4. White Card Stock die cut with ODBD's Lattice Background Die and altered with scissors to cover half of DP

  1. Gold DP from ODBD's Wedding Wishes Paper Pad; die cut with ODBD's Filigree Frames Die
  2. White Card Stock, Black Ink, sentiment from NEW Long Lasting Love; die cut with Ovals Die
  3. Image from NEW Long Lasting Love, stamped with Black Copic compatible ink on card stock, colored and die cut with Rectangles Die
  4. Pink and green card stock, Bitty Blossoms Die with Liquid Pearls White Opal Centers 
Copic Colors -

W3, CO, C3, E29
YG61, YG63
RV00, RV02
Y11, Y15, Y26, E25
B34

and the inspiration photo from Danielle & Josh Menning Photographic


Thanks for visiting!  Until next time, 
Blessings!

Friday, June 23, 2017

~ They Lived Happily Every After Lantern Tablescape ~

Good morning and welcome!  Today, I have a beautiful vellum lined lantern perfect for a summer wedding.  I placed a battery operated tea light in mine and a few hand made blossoms for the table. 

So I started with a soft blue card stock and used Our Daily Bread Designs' Luminous Lantern Die cutting out the bottom and 5 sides.  On the front, I used the Double Stitched Rectangles Die to cut out the front panel and add a vellum layer using the Rectangles Die.  I stamped my sentiment (from ODBD's Happily Ever After) directly on the vellum with a turquoise ink and added a bit of clear embossing powder and heat set it.  I also added a bit of greenery (Fancy Foliage Die) and a cute picket fence using the Fence Die.  I created the roses with the Rose Dies and coordinating Rose Leaves Die.  The roses were created with white card stock, inked with Abandoned Coral, Work Lipstick and Mowed Lawn Distress Ink.  After drying, I added a bit of Pearl Glimmer Mist for shine.  The roses are free standing...  I chose to NOT attach them to the lantern so they could be moved.  A bit of white seam binding ties it all up.  SO here are the June release items you see...

and a few other fun items...


Thank your for visiting and have a great night!
  

Friday, June 16, 2017

Time for a Look Back at June's Release at ODBD

Good morning and welcome to a special look back at this month's Our Daily Bread Designs release. 
Here is the project I created using Long Lasting Love stamp set and Wedding Wishes Paper Pad.  For more inspiration using the June Release be sure to visit the ODBD Blog.
I started with a gold base measuring 5.5 x 4.25 inches from the Wedding Wishes Paper Pad collection.  I selected a coordinating gold and white print (also from this collection) and used ODBD's Pierced Rectangles Die to cut out the DP layer, white card stock layer (to create the lace layer) and another sheet of gold DP.  Once I cut the three layers, I used the Leafy Edged Borders Die to create the wavy layer (including the white lace layer.)  I stamped my image (from the new Long Lasting Love with a watermark ink on white Card Stock) and embossed the image with gold embossing powder.  I die cut the image using the Pierced Ovals Die and nested a gold mat layer underneath using the Ovals Die set.  I created the floral spray with white card stock and the Pretty Posies Die along with the gold DP and ODBD's Fancy Foliage Die.  I treated the blossoms with Iridescent Gold Glitter Mist and added seed pearls with a clear glue to each center.  The sentiment (also embossed and from the Long Lasting Love stamp set) is matted with ODBD's Ornate Ovals Die.

Here are the new items you see...


and a few old favorites...


Thank you for stopping by!  Please take a few moments to visit my design team sisters and leave some love!  We love hearing from you and appreciate your comments!  Blessings...

Sandee * Lisa * Cathy * Diana * Julie 
Kathy * Robin * Lori (ME)Helen * Dawn * Sabrina

Wednesday, June 14, 2017

~ Boho Mr. & Mrs. ~

Sometimes you find something so cute that you just have to try creating it again!  Last week I shared a card featuring a few new products from Our Daily Bread Designs.  Well I loved the card SO much I decided to create a similar card with an entirely different technique.  I love finding new ways to incorporate the items I have in my stash.  And this time, I found a fun new way to use the Scalloped Chain Die.  I also used the Mr. & Mrs. Die and Long Lasting Love stamp set (again).  That's a sure sign of something infinitely useful in my stash!  ;-) 

Really, it isn't nearly as complicated as it looks.  I started with a rich eggplant card stock base.  I added a slightly smaller white card stock layer, distressing the edges.  For the next layer, I used the Scalloped Chain Die and white card stock.  After die cutting, I adhered the die cut to a layer of white card stock and inked both the scalloped chain die and white background in graduated distress ink colors.  For this project I used a purple, ocean blue and teal color.  After inking it to the desired intensity, I trimmed the bottom layer (now inked) to fit neatly under the die cut.  Here is a photo of the completed base.  But notice what is different?  After inking, I FLIPPED the die cut so the color spectrum would be reversed and ADDED back the white center pieces with glue.  :-)  Here's a photo AFTER flipping and before adding anything else!

Then I could get down to business and dress up this baby!  I added a white sentiment mat (created with ODBD's Ovals Die) and focal panel (in a rich purple) using the Layered Lacey Ovals Die.  The NEW Mr. & Mrs. Die and a bit of teal CS create the center die cut.  I added a few white CS posies (frosted with glitter on the edges) using ODBD's Pretty Posies Die and Lovely Leaves Die.  I stamped the sentiment with a soft teal ink on white card stock (Long Lasting Love stamp set) and die cut it using an old favorite, Layered Lacey Ovals Die.  And for a bit more bling, I added clear micro beads in the center of each blossom. 

So here are the new items you see...


and a few old favorites...


Thank you for stopping by!  Be sure to come back Friday.  I have a special look back project featuring more products from this month's release at Our Daily Bread Designs.  This one will have a whole lotta gold...  Blessings!

Monday, June 5, 2017

~ Mr. & Mrs. ~

Good morning and welcome!  I hope your Monday was kind to you!  Our family just finished up a week of vacation.  We did very little other than doctor appointments and honey do tasks.  We did take a couple of day trips!  We spent an entire day traveling US 68 in Kentucky for the 400 Mile Yard Sale.  I am normally NOT a rummage/yard sale participant.  However, over the last few years, I have had tremendous luck finding antique (collectible) treasures.  We traveled nearly 200 miles in one day, with hubs being the spotter (he has an uncanny knack for finding the perfect sale with what I am looking for.  He is TOTALLY going every year from now on...  lol)  We encountered an AMAZING oak tree in Harrodsburg, Kentucky.  The homeowner told John it was over 20 feet around in circumference!  With Fort Harrod (the oldest continuous settlement in Kentucky) only a quarter mile away...  I'm convinced the early settlers saw that same oak!!!  We had so much fun we decided to drive about 2 hours north to browse the Historic National Road Yard Sale on US 40, also this weekend.  We started near Springfield, Ohio and cruised into Dublin, Indiana before returning home.  Sadly, that trip was not nearly as productive.  I made it home with one Blue Atlas jar.  But honestly, the traffic in that area was CRAZY and sadly the pickings were not what I look for!  Oh, well!  But we sure had fun!  I think we spent more on food and gas than we did treasures!  But my husband proudly told me that he was no longer afraid of yard sales.  I had to inquire about that....  His response?  He didn't know that you could just strictly limit yourself to buying a few things...  lol...  He said in years past, he always came home with stuff he would just throw away...  because he felt like he had to buy something!  😔😀 So now I have created a monster!  Granted, one that won't buy anything... hee hee 

Today, I have another card to share with a wedding theme...  For this project I used Our Daily Bread Designs' Happy Wedding Day, Wedding Wishes Paper Pad, Scalloped Chain Die and Mr. & Mrs. Die.


 I started with a soft silver Designer Paper layer, added a silver print DP (cut slightly smaller) and a deep silver DP cut with the new Scalloped Chain Die.  (All papers are in the NEW Wedding Wishes Paper Pad.) I stamped the sentiment (Happy Wedding Day) with a soft gray ink and die cut my panel with the Double Stitched Pennant Flags Die.

For the center panel, I used the Mr. & Mrs. Die and Wedding Wishes Paper Pad nested on a matted panel created with the Ovals Die and Pierced Ovals Die.  A couple of die cut white hearts (Layering Hearts) adorn the bottom.  Here are the new items from this month you see...


Thanks for stopping by!  Until next time,

Blessings!
 

Thursday, June 1, 2017

Welcome June with a New Release from Our Daily Bread Designs

Good morning and welcome to Our Daily Bread Designs' June release.  June is traditionally the month for weddings.  And this release is all about the beauty of love and the magic of saying I Do.  From a new paper pad to stamps and coordinating dies, ODBD has just the right supplies to help us create the perfect card.  First up, I have a card featuring the new Happy Wedding Day stamp set, coordinating Heart Topiary Die and new Wedding Wishes Paper Pad.


I started with a white card stock base, cut at 4.25 inches and then at 11 inches.  I scored and gate folded the card at 5.5 inches.  I chose a soft smoky DP from the new Wedding Wishes Paper Pad and die cut it with ODBD's Pierced Rectangles Die.  I chose a lovely wedding print from this same collection and die cut it with a slightly smaller pierced rectangle die.  I stamped the images (topiary and birds from Happy Wedding Day, coordinating Heart Topiary Die) with a Copic compatible ink on card stock and colored with Copics before die cutting.  After cutting, I placed it on another smoky DP layer and added a sentiment layer (Happy Wedding Day) on a die cut layer Ornate Ovals Die.


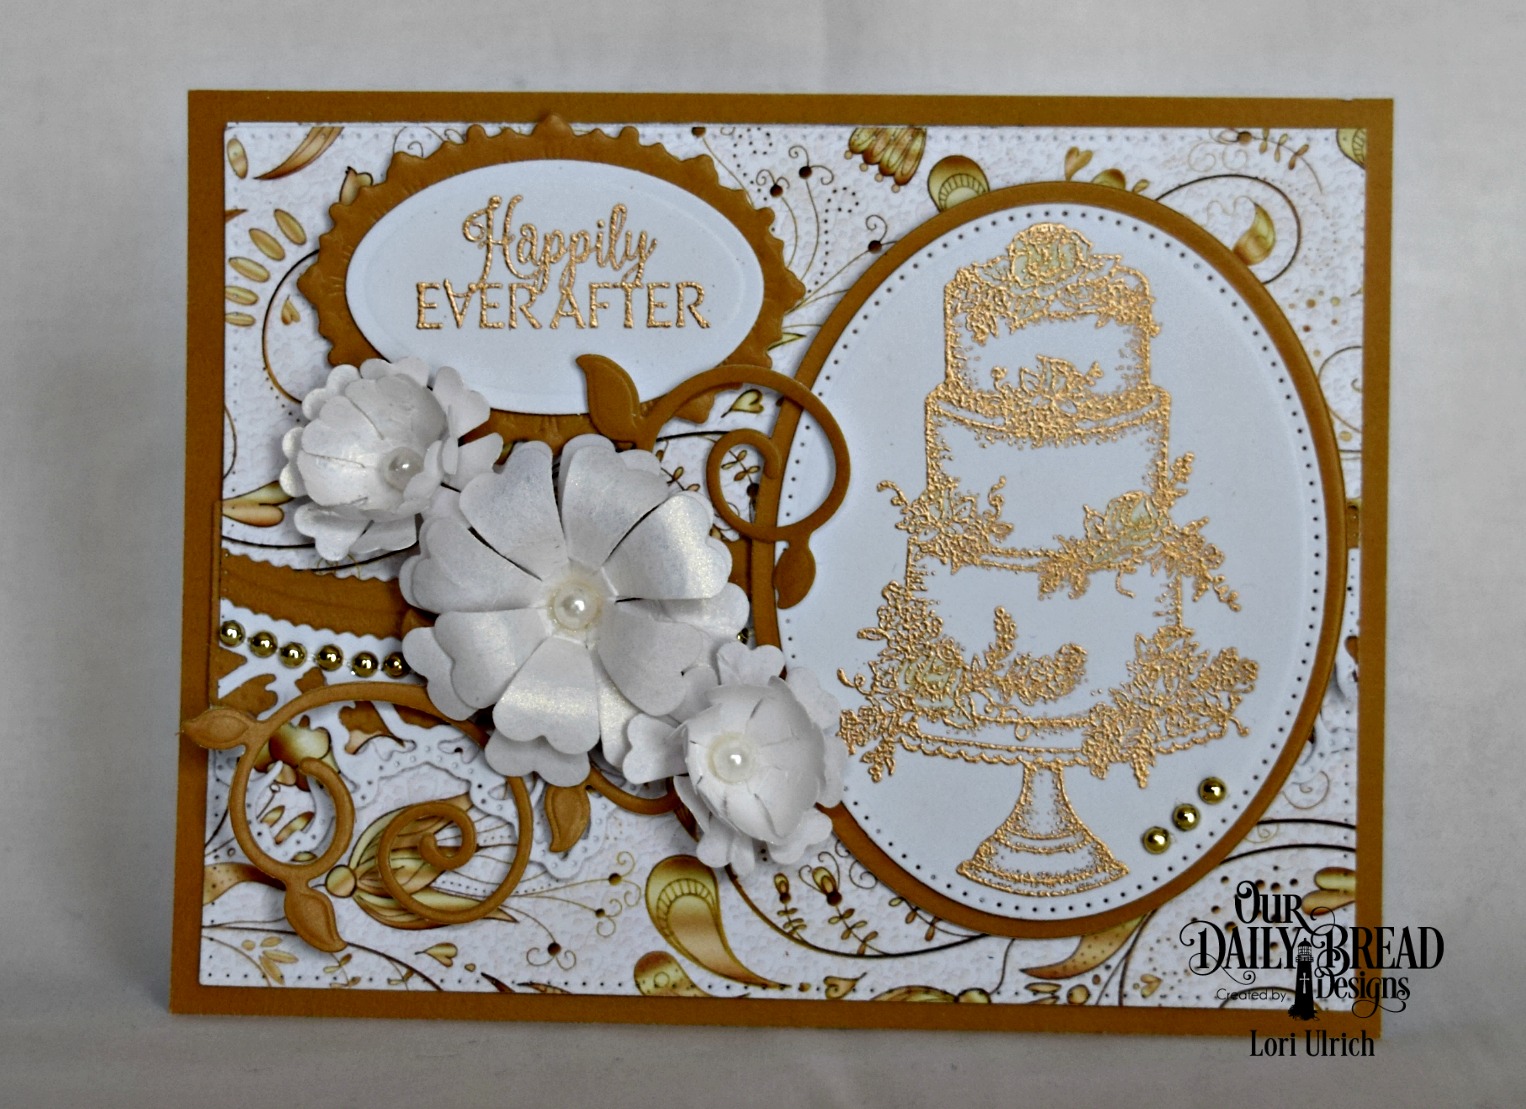
So for my second card, I decided to do more of a gold tone... with a fun white seam binding bow....

So this time, I went with a 5.5 inch wide card and gate folded a 8.5 inch card at 4.25 inches.  I added a gold 5.5 x 4.25 inch DP layer using the new Wedding Wishes Paper Pad and another slightly smaller DP with a gold dove image.  I stamped the sentiment with Versamark on white card stock (Happily Ever After) and embossed after adding gold embossing powder.  I cute a slightly larger mat with a rich gold DP (also from the Wedding Wishes Paper Pad) with a old favorite from the Stitched Ovals Die.  I added a rose created with the Rose Dies and Rose Leaves Die.  And here are the new items you see here..


 AND don't forget about today's blog hop!


Three randomly selected winners will each receive a $25 Gift Code to the ODBD Website  just for commenting on the Design Team cards!  You have until June 2, 2017 at 9:00 p.m. EDT to leave your comments on the Designers Blogs for a chance to win!  The Winners will be posted on the ODBD Blog on June 3rd so be sure to check back there to see if you won!


Be sure to check out our BLOG if you get lost along the way...

and now for the design team...


Cathy * Grace * Angie * Dawn * Chris 

Sandee * Helen * Julie * Robin * Lori (ME)

Lisa * Diana * Kathy * Sabrina

In case you were wondering, here are a few of the other items you saw today...


And Copic combos...

B21, B23, B24, C0, C1, C2, C3, E55, E57, YG61, YG63
Inks - Memento Gray Flannel, Memento Tuxedo Black, Versamark, Delicata Golden Glitz
Embossing Powder - Ranger Queen's Gold 
White Seam Binding 
Recollections Microbeads - Gold

Blessings!

Surprise!!! It's Best Bunny!

There is something about Granny Apple Green that just brings a smile to my face!  When the first signs of Spring appear you are sure to see...